Monday, March 23, 2009

Smart Objects - The bridge between 2 programs


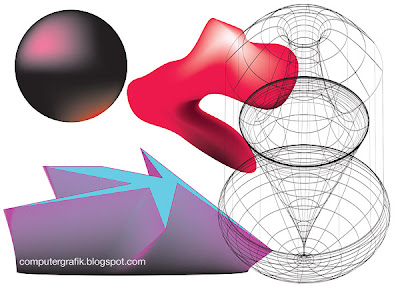
As we saw in class Illustrator has many tricks up it's sleeve. Not the least of which are some of the 3d options shown in the above image. All of the above shapes, unique to illustrator could be pasted into Photoshop as Smart Objects. As Smart Objects they would retain all their vector clarity. The above effects include the Mesh tool, 3d revolve and the Blend Tool.

A smart object can be created in Photoshop by selecting Object > Smart Object > Make. Additionally a smart object can be made when you copy and object from Illustrator and paste into Photoshop (at least Photoshop will prompt you and ask if you want to import the object as a smart object). The advantage to a smart object is that you can manipulate layers without destroying the original layers pixel integrety. For example you could have a large photo that you have converted into a Smart Object. You can scale that photo down to 20 percent and later scale it back up to 100 without suffering any pixel loss.

You edit a smart object by double clicking it in the layers palette and working inside of a new window that will appear. Once you have made your desired changes (I.E. adding additional layers or effects) you select File > Save and the changes will automatically appear in your original document window. You can then close the smart object window as well.

If the smart object was placed from Illustrator (or copy and pasted from Illustrator) the new window that opens when you double click your smart object layer will actually be in Illustrator. The same rules apply though. Make any changes you wish, hit save and the updates will appear in your original document in Photoshop.

Click here for Smart Object Video Lesson

Friday, March 20, 2009

Dynamic Opposites Think Tank 2

5 more ideas illustrated by pre-computer Art History:
William Blake (Light vs Dark), Ernst Stohr (Man vs Woman), Arcimboldo (Man vs. Nature), Rohan Master (Physical vs. Metaphysical), and Jan Van Eyck (Real vs Artificial)

Monday, March 16, 2009

Dynamic Opposites Think Tank

The following selection of images is meant to spur your imagination in regards to our next project that deals with dynamic opposites. From first to last the following images are by, Gregory Crewdson (above vs below), Martin Kippenberger (objectivity vs abstraction), Koen Hauser (inside vs. outside), Naoki Honjo (real vs artificial), Ghada Amer (objectivity vs. abstraction pt. 2), John Roebas (traditional vs. modern), Student Image 1 (life vs death), Student Image 2 (nature vs industry).

Clipping Mask in Illustrator

Cutting things out in Illustrator isn't as intuitive as it is in Photoshop but once you understand some of the fundamentals you'll be well on your way to happy cutting. The following method works well in most situations, both for paths and raster images.

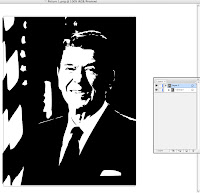
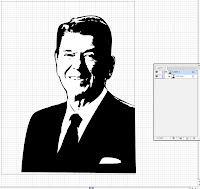
The problem: I have an image that I have live traced and I want to "cut out" the background and leave the figure. I could have done this to the photo in Photoshop before opening the image in Illustrator but too late, I didn't.


The above image shows my current predicament, both in my document window and my layers palette.


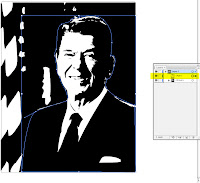
I need to use the pen tool to trace around the part of the image I want to keep, in this case the figure. You can see the newly created path just above my live trace group in the layers palette.


The path always needs to be above the object or group you want to effect. If your path shows up beneath the object or group you will need to move it in the layers palette to a location above the area you want to effect. In my layers palette I SHIFT-SELECT both my path and my live trace group to activate both selections (BOTH MUST BE SELECTED TO PROCEED!)


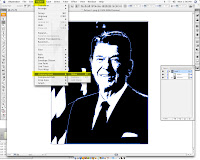
Next select OBJECT > CLIPPING MASK > MAKE


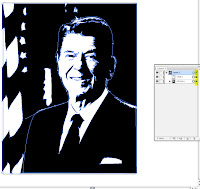
I now have the background removed and the figure remaining. I turned on the grid (VIEW > SHOW GRID) to emphasize the resulting transparency around the figure. The mask is still live so if you need to make more adjustments to it you can use the Direct Selection Tool (the white arrow) to alter individual points just like you would with any other path.

Wednesday, March 4, 2009

Project 3 + Spring Break Art Guide

ART TO SEE OVER SPRING BREAK:
In Philly: Monumental Prints at the Philadelphia Museum of Art + The Brothers Quay at Rosenwald-Wolf Gallery (UArts). Both of these shows are free (just flash your Temple ID at the PMA and say you are taking a class at Tyler School of Art).

In NY: 20 bucks gets you to NY and back on the
Chinatown Bus or Bolt Bus. Once you're up there here are some other recomendations in Chelsea beyond the Paul Morrison show. Kamrooz Aram's magical paintings at Perry Rubenstein gallery, John Wesley's abstracted pop paintings at Fredericks and Freiser, and for a dose of the untraditional check out the group show at Postmaster. The Piero Manzoni retrospective is worthwhile at Gagosian and of course when all else fails the MET is always pay-what-you want and there is more than enough art there to keep you busy. But before leaving Chelsea grab lunch at Tia Pol at 205 10th Ave. For under $10 you can grab a great sandwich (though don't expect large portions). Buy a fun pass for the subway and make a day of it.

PAUL MORRISON:
London-based artist Paul Morrison creates bold graphic paintings and sculptures that represent a mash-up of 19th century woodcuts. The large scale wall paintings find similarity with David Hockney's Hogarth infused set designs for
The Rake's Progress. They are difficult to reproduce well over the computer but are rather striking when seen in person. See them in person at Cheim and Read gallery. The show comes down March 21st. See images below.