Showing posts with label after effects. Show all posts
Showing posts with label after effects. Show all posts
Monday, December 7, 2009

Monday, November 16, 2009
Classic Post: How to Data Mosh
These how-to videos are brought to you by Ryan who shared them with me last semester. These tutorials shows you how to create the effects seen in Chairlift's Evident Utensil video.

above: Screen capture of data mosh as seen in Chairlift's Evident Utensil Video. Click here to watch full video.
How To:
Part I
Part II
Part III

above: Screen capture of data mosh as seen in Chairlift's Evident Utensil Video. Click here to watch full video.
How To:
Part I
Part II
Part III
Thursday, October 8, 2009
Hiraki Sawa @ Vox

Great use of After Effects on display at VOX Populi gallery (319 N 11th St # 3, ring the buzzer) through November 1st by James Cohen artist Hiraki Sawa. While you are there check out some of the other great art in the show including the big woodblock prints of Rob Swainston and the silkscreen and collage works of Eva Wylie. There is no cost for this event.
Wednesday, September 2, 2009
mrmama
animizacja NOWA* from mrmama.tv on Vimeo.
Mrmama is Polish motion graphics guru Arkadiusz Nowakowski. He creates a striking result through toying with the tension between the building's structural reality and the 3d and 2d structures that he invents. Also there is an interesting stylistic play going on here between the classical architectural facade and the projected video game graphics circa early 1980s.
Monday, April 27, 2009
After Effects - Human Figure (parenting example)
Parenting in After Effects is an essential technique for animating multiple objects that have a dynamic relationship to one another. With parenting you can have multiple layers, with different transform options, moving as one. In a basic timeline with two layers, parenting one of those layers makes one layer the parent and one layer the child. The child is always subservient to the transform options of the parent. The parent column in the timeline allows you to specify if a layer is a parent or child through a simple dropdown menu (at least in version 6.5).
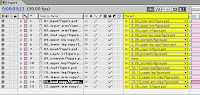
Above: The parent column in AE 6.5 from the video below (click to make larger)
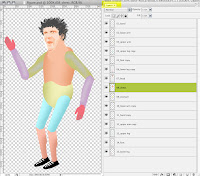
Above: View of the layers palette and canvas in Photoshop for the movie below (click to make larger)
For example, to animate the human body the movie below does in After Effects, you would arrange the individual body parts (each on their own layer, prepared beforehand in Photoshop) so that the smaller elements are made into children of the larger parent elements. This means the toes are children of the foot and in turn the foot is a child of the lower leg. The lower leg is a child of the upper leg and the upper leg a child of the torso. One of your layers will be the absolute parent of all of the children and in my example it's the lower half of the torso named 09_stomach. Because 09_stomach is the absolute parent, any transform options for that layer will effect all children of that layer. In order to make the figure bounce into the air slightly as it jogs I edited the position transform options for 09_stomach and all other children were then effected.
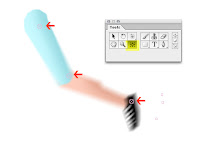
Above: The pan behind tool highlighted in yellow and the anchor points (joints) for the leg indicated by the red arrows.
In addition to logically parenting the body parts, you will need to use the pan behind tool to move the anchor point for each layer to approximately where the functioning joint would be found on the human figure. The pan behind tool is located in the tool palette and simply moves the anchor point of a layer to wherever you drag it to. The foot for example would need to rotate exactly at the ankle so the anchor point must be moved to reside at that location. Once you have your parent / child relationships setup, your layers in the right order, and your anchor points logically adjusted, you may begin setting some keyframes and animating the figure as you would any other object in after effects. For the video below I am only using the position transform option on the body and rotation transform options on all of the other parts.

Above: The parent column in AE 6.5 from the video below (click to make larger)

Above: View of the layers palette and canvas in Photoshop for the movie below (click to make larger)
For example, to animate the human body the movie below does in After Effects, you would arrange the individual body parts (each on their own layer, prepared beforehand in Photoshop) so that the smaller elements are made into children of the larger parent elements. This means the toes are children of the foot and in turn the foot is a child of the lower leg. The lower leg is a child of the upper leg and the upper leg a child of the torso. One of your layers will be the absolute parent of all of the children and in my example it's the lower half of the torso named 09_stomach. Because 09_stomach is the absolute parent, any transform options for that layer will effect all children of that layer. In order to make the figure bounce into the air slightly as it jogs I edited the position transform options for 09_stomach and all other children were then effected.

Above: The pan behind tool highlighted in yellow and the anchor points (joints) for the leg indicated by the red arrows.
In addition to logically parenting the body parts, you will need to use the pan behind tool to move the anchor point for each layer to approximately where the functioning joint would be found on the human figure. The pan behind tool is located in the tool palette and simply moves the anchor point of a layer to wherever you drag it to. The foot for example would need to rotate exactly at the ankle so the anchor point must be moved to reside at that location. Once you have your parent / child relationships setup, your layers in the right order, and your anchor points logically adjusted, you may begin setting some keyframes and animating the figure as you would any other object in after effects. For the video below I am only using the position transform option on the body and rotation transform options on all of the other parts.
Tuesday, April 14, 2009
After Effects Ball Tutorial
 This video from youtube presents an alternative bouncing ball tutorial. Check out this video to expand your abilities in After Effects.
Monday, December 8, 2008
After Effects - Effecient Rendering
The best way for exporting a movie from After Effects is to use the Render Que (Window > Render Que). The default "Best" quality settings are typically preferred for completed projects but can yield a rather large file size even for short movies. The following are some steps to keep your file size down and still get a good quality render. The following screenshots are from After Effects 6.5.
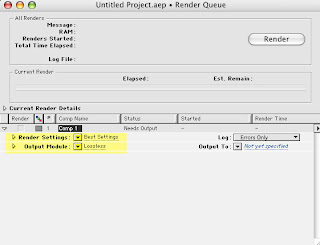
1) In the Render Que Window click the "Best Settings" text next to "Render Settings:"
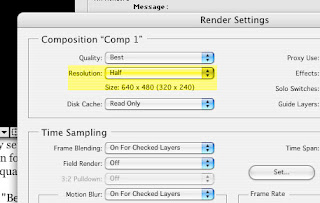 By default this setting is set to "Full." You can reduce this by selecting "Half." Half will give you great quality but will literally reduce a 640 x 480 movie down to 320 x 240. You will get a smaller movie but the quality might be good enough depending on the elements of your animation.
2) If you have already rendered your movie from the Render Que and the file size is so large that it is difficult to transport or play, you can use a separate program to compress the file size of your rendered movie. Depending on the level of detail in your movie a program like iSquint, free to use on the mac, will give you a greatly reduced file size but could potentially greatly reduce the quality of the movie. Even setting all of the settings to the highest possible level in iSquint will give you a file size that is only a fraction of the original. Use the advanced options to maintain your 640 x 480 movie size. You can download here: http://www.macupdate.com/info.php/id/19769/isquint
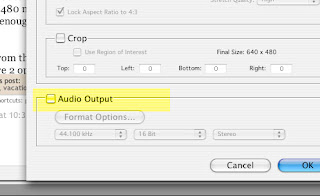 Final Tip: REMEMBER TO CLICK THE CHECKBOX for turning the AUDIO ON by clicking the word "lossless" when you are in the Render Que window.

1) In the Render Que Window click the "Best Settings" text next to "Render Settings:"
 By default this setting is set to "Full." You can reduce this by selecting "Half." Half will give you great quality but will literally reduce a 640 x 480 movie down to 320 x 240. You will get a smaller movie but the quality might be good enough depending on the elements of your animation.
2) If you have already rendered your movie from the Render Que and the file size is so large that it is difficult to transport or play, you can use a separate program to compress the file size of your rendered movie. Depending on the level of detail in your movie a program like iSquint, free to use on the mac, will give you a greatly reduced file size but could potentially greatly reduce the quality of the movie. Even setting all of the settings to the highest possible level in iSquint will give you a file size that is only a fraction of the original. Use the advanced options to maintain your 640 x 480 movie size. You can download here: http://www.macupdate.com/info.php/id/19769/isquint
 Final Tip: REMEMBER TO CLICK THE CHECKBOX for turning the AUDIO ON by clicking the word "lossless" when you are in the Render Que window.
Monday, September 15, 2008
Cliff Evans / After Effects
 Cliff Evans’s Empyrean
I was lucky enough to see Cliff Evan's Empyrean on display at LUXE gallery in New York over the summer. I had no idea what I was getting into when I entered the gallery but after spending about 15 minutes watching the video, I left the gallery in a completely different mood than when I had walked in. I was really moved and disturbed by the work. Also I was excited about the powerful and fairly untapped resource of After Effects. The video was dense, layered, extremely well crafted, complicated, political, witty, dark, beautiful and horrible. In other words it consisted of the stuff that makes up a great work of art. He had thrown in everything but the kitchen sink and made it flow seamlessly and with intention. Please visit his site for more amazing work and video: http://www.cliffevans.net/cliffevans/home.html
 Cliff Evans’s Empyrean
“Fast-moving images surround and bombard us in every part of our lives as never before,” says Pieranna Cavalchini, Curator of Contemporary Art at the Isabella Stewart Gardner Museum, who invited Evans to live and work at the museum in 2006. “Evans takes complex, recognizable images –commercial logos, pop and religious icons, etc. – and manipulates them using rhythm, motion, and time to create complex juxtapositions that pull the viewer in. Once engaged, the viewer is obliged by the sound, the beauty, and the horror of the animated, highly focused images to look more closely and to watch as a strong political and social critique emerges. It is there, and it is vitriolic.”
Subscribe to:
Posts (Atom)