Above: The parent column in AE 6.5 from the video below (click to make larger)

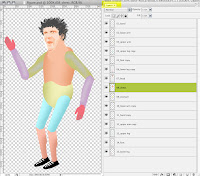
Above: View of the layers palette and canvas in Photoshop for the movie below (click to make larger)
For example, to animate the human body the movie below does in After Effects, you would arrange the individual body parts (each on their own layer, prepared beforehand in Photoshop) so that the smaller elements are made into children of the larger parent elements. This means the toes are children of the foot and in turn the foot is a child of the lower leg. The lower leg is a child of the upper leg and the upper leg a child of the torso. One of your layers will be the absolute parent of all of the children and in my example it's the lower half of the torso named 09_stomach. Because 09_stomach is the absolute parent, any transform options for that layer will effect all children of that layer. In order to make the figure bounce into the air slightly as it jogs I edited the position transform options for 09_stomach and all other children were then effected.

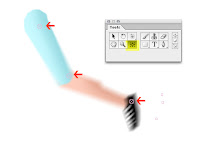
Above: The pan behind tool highlighted in yellow and the anchor points (joints) for the leg indicated by the red arrows.
In addition to logically parenting the body parts, you will need to use the pan behind tool to move the anchor point for each layer to approximately where the functioning joint would be found on the human figure. The pan behind tool is located in the tool palette and simply moves the anchor point of a layer to wherever you drag it to. The foot for example would need to rotate exactly at the ankle so the anchor point must be moved to reside at that location. Once you have your parent / child relationships setup, your layers in the right order, and your anchor points logically adjusted, you may begin setting some keyframes and animating the figure as you would any other object in after effects. For the video below I am only using the position transform option on the body and rotation transform options on all of the other parts.
No comments:
Post a Comment